EZ Importer Documentation
Overview
EZ Importer allows you to import orders and draft orders into your Shopify store. The app is driven by what we call a Data Mapping. As the name implies, the Data Mapping allows you to map the fields in your file to the appropriate fields in Shopify.
On the Data Mapping page, you'll select the fields you want to import (not all fields are required), set data configuration options and default fields, configure prefixes to prepend to specific fields, replace any values in your file, and set up any Order Metafields you may want to be added.
Contents
- Importing an Order/Draft Orders
- Add a Data Mapping
- Custom Configuration
- Order Number
- Link Product By SKU
- File Uploading
- CSV Delimiter Support
- Review Your Import
- Disable Email Notifications
- Shopify Order Calculations
- Import Progress
- Importing With Multiple Line Items
- Declining an Order
- Deleting an Import
- Cancel a Running Import
- Import Action Buttons
- Date Fields
- Activity Log
- Data Retention Policy
- Credit System
- Draft Orders
Importing Orders/Draft Orders
Getting started with EZ Importer is as simple as uploading your file. Once you have your import file ready go to the home page and click the Import Orders button on the top of the screen. This will display a dialog box for you to start your import.

On the Order Import dialog, you will see a Name field, a Data Mappings field, a Select Files button, and a Review Import button. The name and Data Mappings fields are required. You should add a descriptive name for your import. The Data mappings field contains a list of all "Data Mappings" you've created as well as an Add New Mapping option. On your first import, you will see this option only. You can select this option at any time to create a new data mapping based on the file you are importing. When adding a new data mapping from this dialog, you will have to select the order type, which is either Order or Draft Order.
Once you've filled out the required fields, you are ready to select your file. Click the "Select files" button to select the file you want to import. Once you have filled out all the necessary fields, you can click the "Review Import" button. This will bring you to the Data Mappings page, where you can select the headers from the CSV file you've selected to import. If you do not want to continue with the import, you can click the "Close" button.
Add a Data Mapping
A Data Mapping contains information on how to "map" your import file. The mapping allows you to map your import columns to the Shopify fields you wish to import. The mapping uses the column name in the CSV file to associate the value in the column with the Shopify field, so you must have a header row (which must be the first row in the CSV file) in your import file. The field name in the "Header Name" column must match exactly with the field name in the csv header row. The "Header Name" field is case-sensitive.

The fields section of the data mapping is divided into multiple tabs. An asterisk indicates a required field in each tab. If you select one field within a tab, you must select all required fields within that tab. If you do not select a field within a given tab, the required fields will be ignored.
The name field at the top of the "Data Mapping" is required and must be unique. The value provided for the name must not be associated with another Order in your store, or you will receive an error. We do not currently support Order or Draft Order updates.
EZ Importer requires all import files to have an Order Number (i.e., Order Name) or Internal Draft Order ID if using the Draft Orders field. This field helps manage unique orders and orders with multiple line items in your input file.
When importing Orders, if you don't want to send the order number field to Shopify, you can click on the "Ignore order number during import" checkbox. If this checkbox is clicked, EZ Importer will not send the Order Number to Shopify, allowing Shopify to auto-generate this value for you.
Once you've created your Data Mapping, you are ready to import your first CSV file. A "Data Mapping" may be associated with as many imports as you wish; there is no limit to the number of "Import" a "Data Mapping" may be associated with.
Each store can create a maximum of 75 Data Mappings. If you go over this limit, you'll need to delete data mappings before creating a new one.
Custom Configuration
On the Data Mapping page, EZ Importer allows you to add some custom configurations to your imports. These features are useful to many stores but are not part of our default configuration.

Customer configurations vary depending on the import type you choose. Some are similar, like linking by SKU, but others may be relevant exclusively to Orders or Draft Orders.
Order Number (i.e. Order Name)
EZ Importer requires all orders to have the Order Number field when importing orders. If you're importing Draft Orders, this works a bit different since Shopify does not allow you to set the order number on a Draft Order. You can read more about how order identifiers work with Draft Orders here.
This field is used by Shopify to represent the customer's order number. EZ importer also uses this field to help uniquely identify an order in your import CSV. If the csv file has multiple rows with the same Order Number EZ Importer looks at these orders as one order with multiple line items. EZ Importer also uses the Order Number field to check for duplicate orders. If an order with the same Order Number exists in your store EZ Importer will not import the order.
There are times when you do not want to provide the Order Number with your import. Although this field is required for EZ Importer, we do allow you to exclude the field when importing to Shopify. If you wish to exclude the Order Number during the Shopify import process you can click the "Exclude order number during import" checkbox on the "Data Mappings" section.

It's important to understand that by "Excluding" the Order Number from your Shopify import, EZ Importer can no longer check for duplicate orders. When you click the "Exclude" order number checkbox, EZ Importer no longer does the check because the order number is generated by Shopify. You will need to ensure you are not importing duplicate orders if you have "Exclude Order Number" turned on.
Link Product By SKU
When doing imports you may want to link your orders to their products. You can do this by either providing the Shopify Product ID and Variant ID, or you can link them by SKU. It's preferable that you link the import by Shopify Product ID and Variant ID for two reasons. The first and most important is accuracy. These two fields are unique in the Shopify admin. The second reason we prefer you link your products by their ID is because it's more efficient. When linking by Shopify Product ID and Variant ID, we just need to provide these values, and Shopify will link the products for us. This is a very efficient process.
We understand that providing the Shopify Product ID and Variant ID is not always easy, and many of you may be maintaining a list of SKUs with your products. Sometimes, getting the SKU for the order is a lot easier than trying to maintain a list of Shopify Product and Variant IDs. To try and make things as easy and flexible as possible, we have a feature that will allow you to link the product by its SKU.

In the Custom Configuration section of the Data Mappings you can turn this feature on. From here all you need to do is select the Link product by SKU checkbox. This will tell EZ Importer to try and find the product by SKU when doing an import. Once you've checked this checkbox you'll need to select the line_item.sku Shopify Field. Click on the Line Items tab and click the checkbox to the left of the line_item.sku field. This will activate the field.

We've made this a custom configuration because the SKU numbers are not forced to be unique in the Shopify admin. This means you, the store owner, need to ensure the SKU numbers are unique. EZ Importer looks up the product information using the SKU and will grab the first one it finds. If you have multiple products with the same SKU, there is a chance EZ Importer may grab the wrong product. As long as your SKU numbers in Shopify are unique, EZ Importer will find the correct product.
We also allow you to Link product By Barcode, which works the same way as the link by SKU option but uses the barcode on your products in your Shopify admin. To use this feature, simply click the Link product By Barcode and map the barcode field in your file. Do note that the barcode field is not sent to Shopify as they don't support importing this field.
File Uploading
EZ Importer allows you to upload CSV files up to 20MB in size. With all fields selected in the "Data Mappings" section, you can upload a little more than 20,000 orders. If you are uploading a subset of the fields in the "Data Mappings" section, you may be able to upload more than 20,000 orders. We allow you to upload a maximum of 50,000 rows in your file. Read our large import documentation for more details.
Uploading large files could take a few minutes, so it's best to be patient. We estimate a 20MB file could take up to 5 minutes to upload, depending on your internet connection. If you click the "Close" button before your upload is complete, it will cancel.
CSV Delimiter Support
EZ Importer supports multiple CSV delimiters. When importing with EZ Importer, your CSV file can use the following delimiters: comma, semi-colon, pipe, and tabs. If you upload a CSV file that does not use one of these delimiters, EZ Importer will throw an error. Also, note that EZ Importer uses the Excel dialect when importing. By default, we use double quotes to escape delimiters in your data.
If you have any questions about CSV delimiter support or would like us to support a delimiter that your file uses, feel free to contact us.
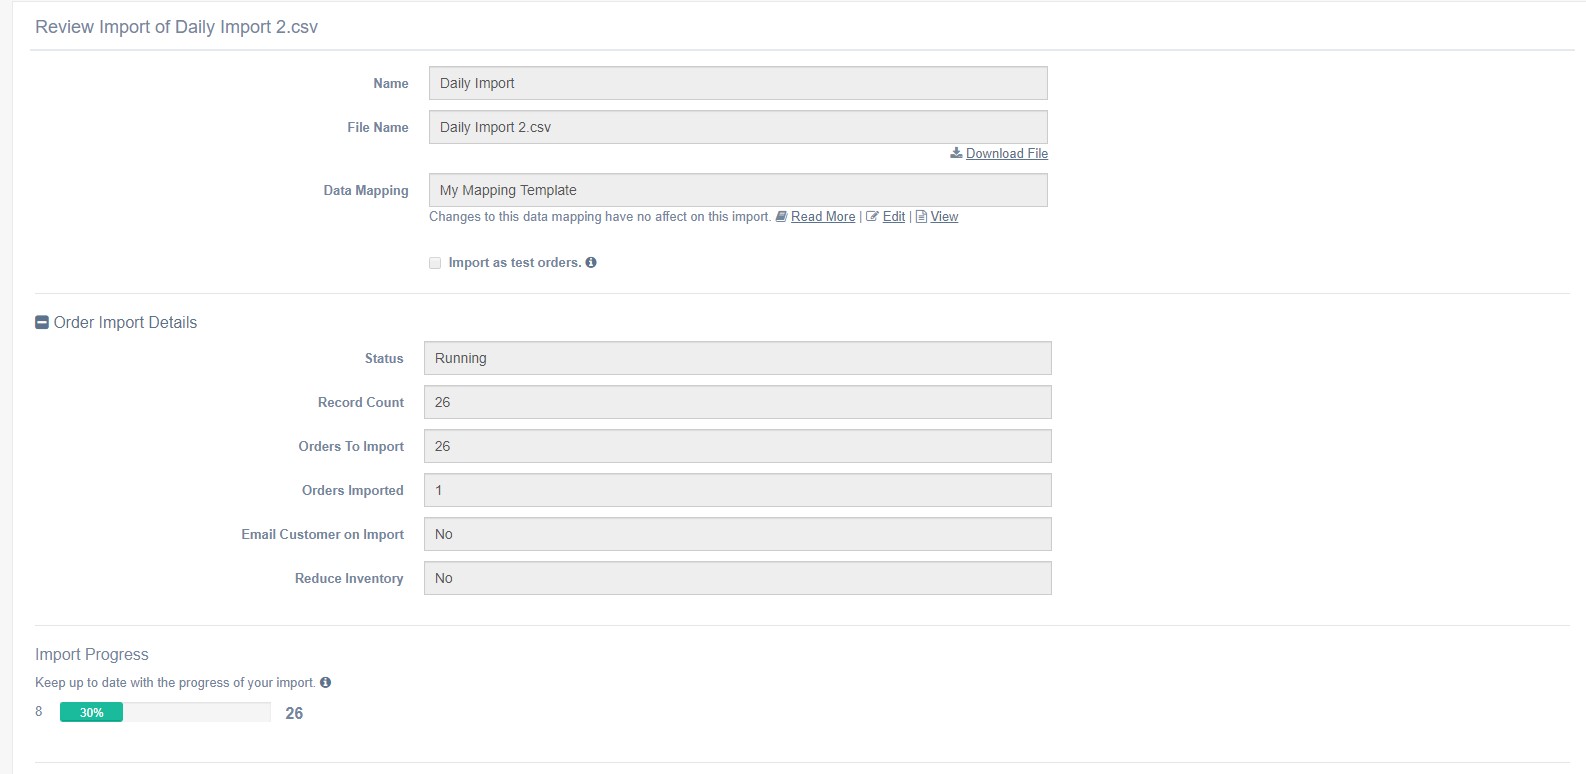
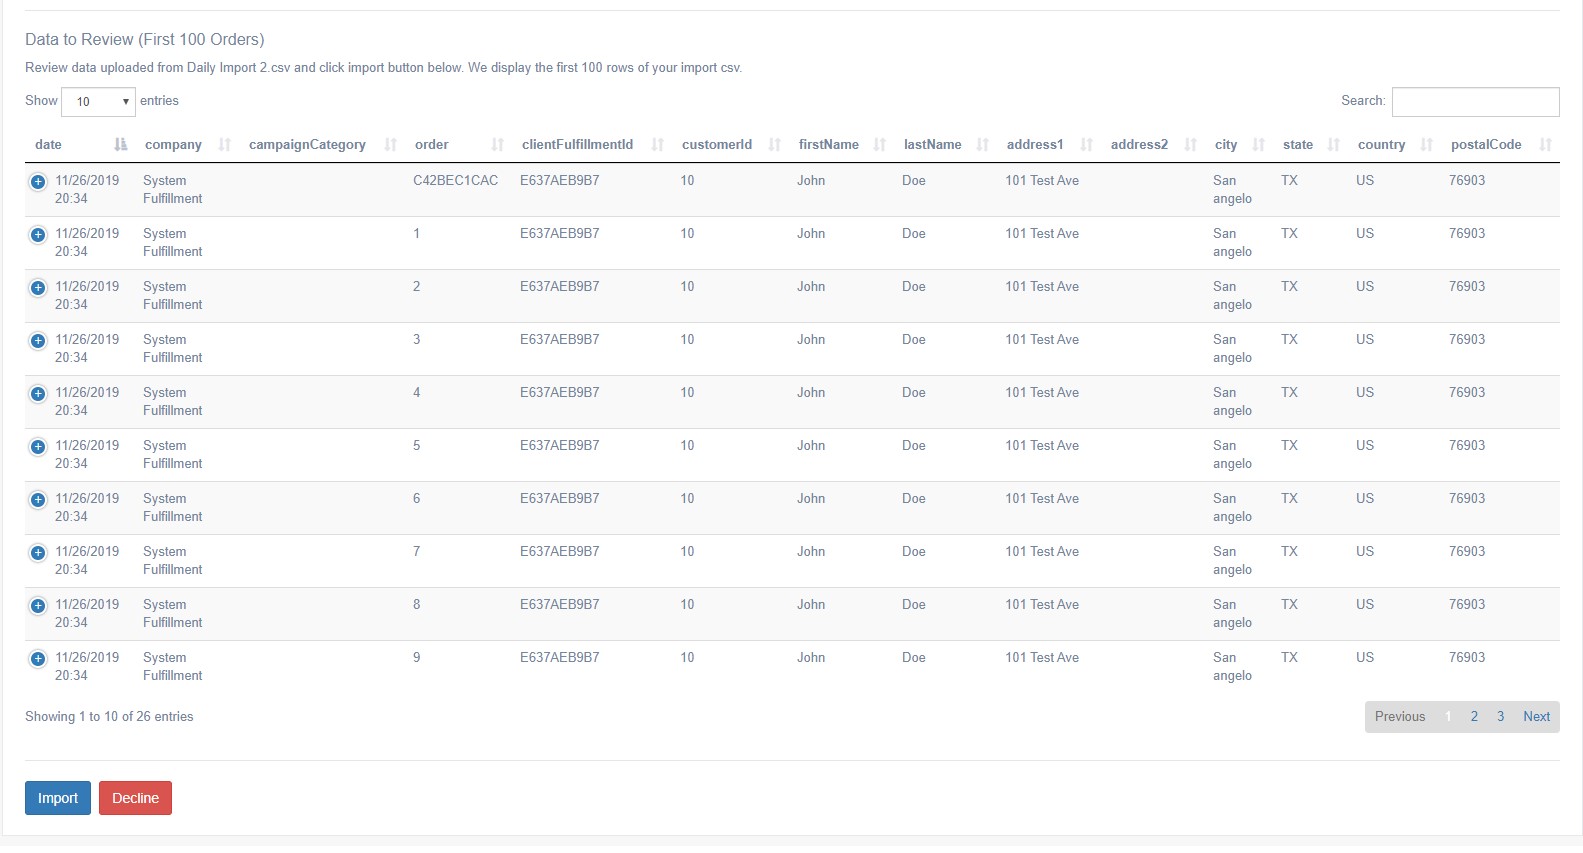
Review Your Import
Now that we've imported our order, we must review it. Clicking the "Review Import" button on the "Order Import" dialog brings you to the review page. Here, you can review the details of the import and the data from your CSV file to ensure it was imported correctly.
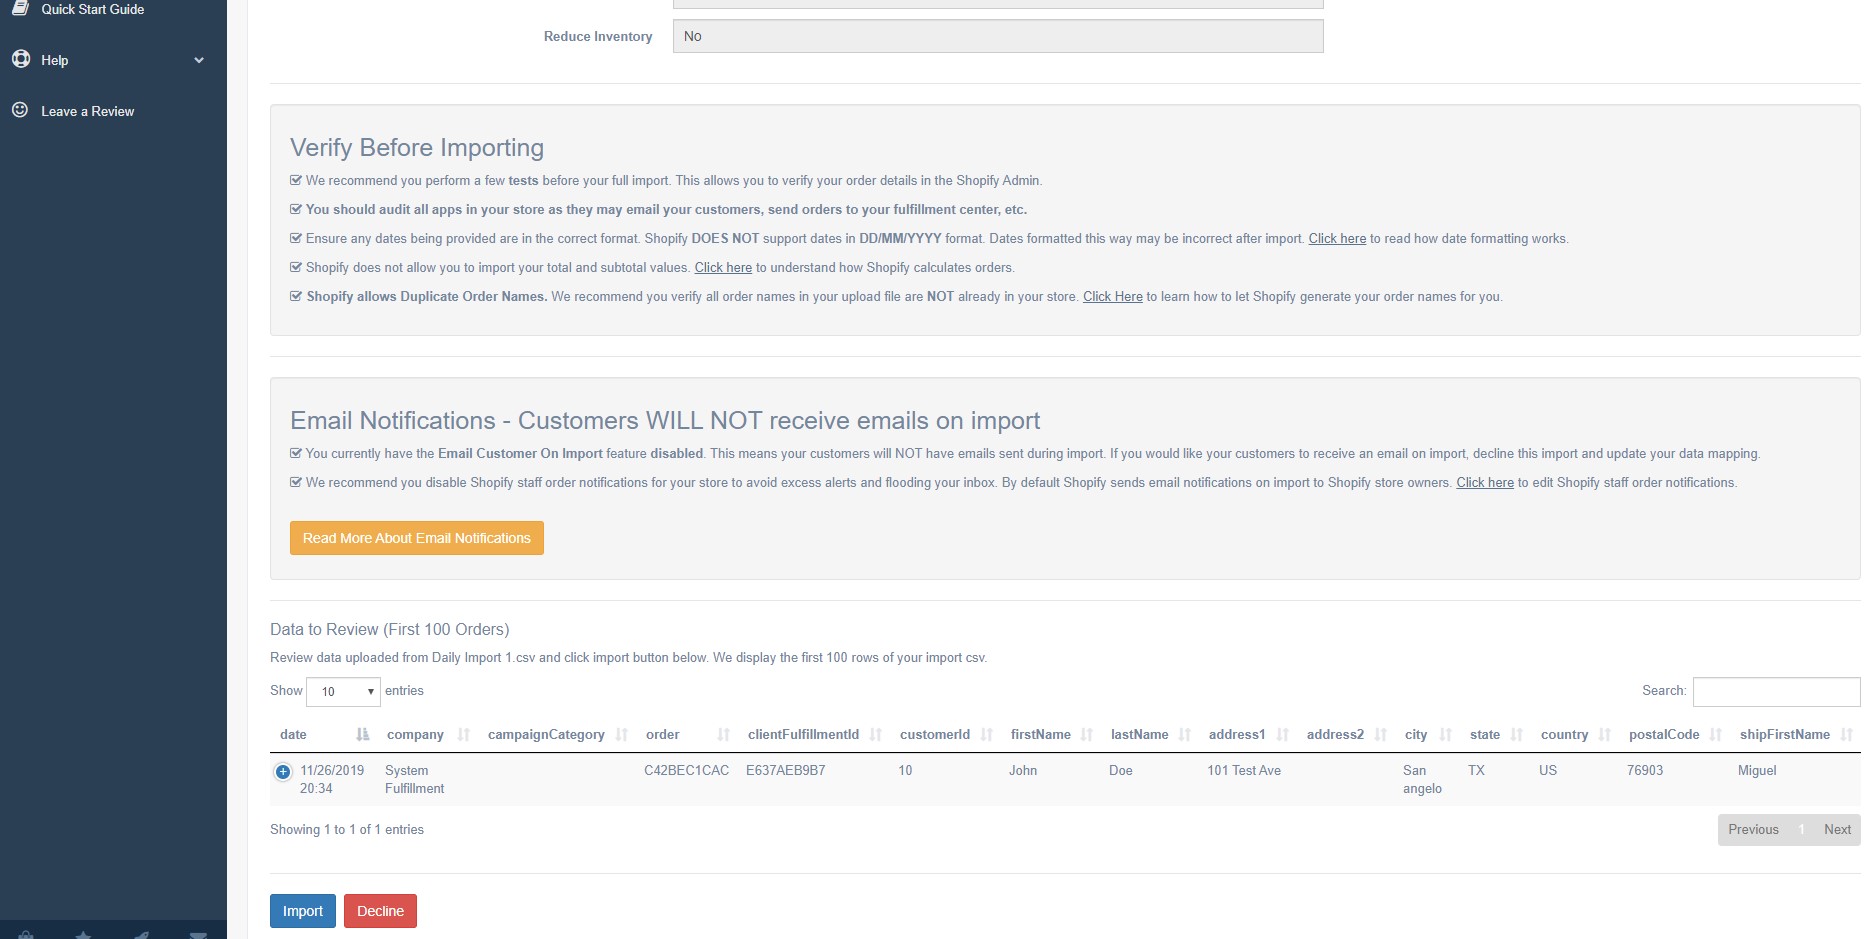
There are a few sections to pay attention to here. The first and most import section is the Data to Review section of the page. Here you can look over your import data. It's important you review the data to ensure your import file was read correctly. If you see an error in the file, you can click the Decline button (we plan on creating a re-upload feature in the near future), go back, fix your import file, and create a new "Order import" from the homepage. If your import looks good, you can click the Import button, which will start your import.
If there is an error importing an individual order the app will log the error and move to the next individual order in the import. At the end of the Import we will display what orders had errors and what orders were successfully imported.

After the order has run, if there are errors, we will display them in the Error Messages section. This section will list the Order Number that had the error and the error itself. In the Import Data section, you will see successfully imported orders marked green and orders that have errors marked red.
Shopify allows 1 API call every 2 seconds under normal circumstances. This means a single order will be imported every 2 seconds. During our testing we've seen this number grow with large data imports. We have seen Shopify throttle the API calls between 6 and 10 seconds per single order import. So you may see longer upload times for large order imports. EZ Importer processes your orders in the background, so once the import has started, you can leave the view import page without having to worry about your import stopping.
Disabling Email Notifications
By default EZ Importer will NOT send email notifications to customers. If you do want emails sent to your customers you can configure this on your data mapping. To turn the feature on go to your data mapping and click the Email customer on import checkbox in the Custom Configuration section. This will tell Shopify to email the customer associated with the order if it's successfully imported. Before using this feature, please read our detailed documentation here.
Shopify will also send email notifications to store owners. This is something we can not control from EZ Importer. You may want to turn these notifications off before running your import. To do this, you'll have to edit the Staff order notifications option on your Shopify admin. To make changes to this setting go to your Shopify admin and click on notifications in the settings menu. For more information on how this works, you can read our documentation here.
Shopify Order Calculations
When importing orders, Shopify will calculate the total and subtotal fields based on your import data. In order to ensure these fields are calculated properly, you should have the following fields in your CSV file and selected in your "Data Mappings" configuration.
- The "Line Items Price" field will be used to build your subtotals. It will be multiplied by the "Line Items Quantity" field to give you your subtotal.
- You can apply discounts to your orders by mapping your discount fields to the "Discount Codes" tab in the "Data Mappings" section. You should fill out the "Discount Code" and "Discount Amount" fields. This will allow your discounts to show up in the Shopify order. The discount will be applied to the order by selecting the "Total Discount" in the "Order Details" section of the "Data Mappings".
- You can apply shipping charges to your orders by filling out the "Shipping Lines" tab of the "Data Mappings." The "Shipping Lines Title" will display the shipping title for the order. You must fill out the "Shipping Lines Price" for shipping charges to apply.
- You can apply taxes to your order by filling out the "Total Taxes" field on the "Order Details" tab of the "Data Mappings." This will then apply any taxes to the order.

With all these fields filled in, Shopify will calculate your Order "Total".
Import Progress
It can be difficult to figure out how far along a large import is. To try and keep you up to date on your import status we have added an import progress bar on the "Review Import Order" while your order is running. This way you can see how far along your import is. Closing this page will not stop your import, so if you have a large import, you can start the import and then come back to this page to check the status. You do not need to refresh the page for the progress bar to change; it will update itself. However, you will need to refresh the page when the order hits 100% to see your final status, what orders were successfully imported, and which orders may have failed to import.
Importing with Multiple Line Items
There may be occasions in which you want to import multiple line items for an order. You can do this by using the same Order Number for multiple orders within your CSV file. EZ Importer builds the order from the first order with the Order Number in the file, and it will add the line items for all other orders with the same Order Number in the CSV file.

For example, you have two t-shirts your shop has sold. In the import file, you would add an entry for each line item. We are going to assume the Order Number for this order is 11010. You need to mark each line in the CSV file with this order number. EZ Importer will find the first entry for Order Number 11010, when it finds the second entry with the same Order Number it will ignore all fields except for the line item fields you've specified in the Data Mapping.
Declining an Import
If you've reviewed your order import and realized you made a mistake, you can simply decline the Order Import. At this time we do not allow re-uploading your csv file. Instead, you can click the "Decline" button on the Order Import Review page, which will mark the Order Import declined, and you will no longer be able to import your order. This will prevent you from importing an order with an error by mistake, and it will keep your import history clean.
When you click the "Decline" button, you will be brought to another page that asks you to confirm the decline. From here, simply click the "Yes, I'm sure" button and the order will be marked as declined.
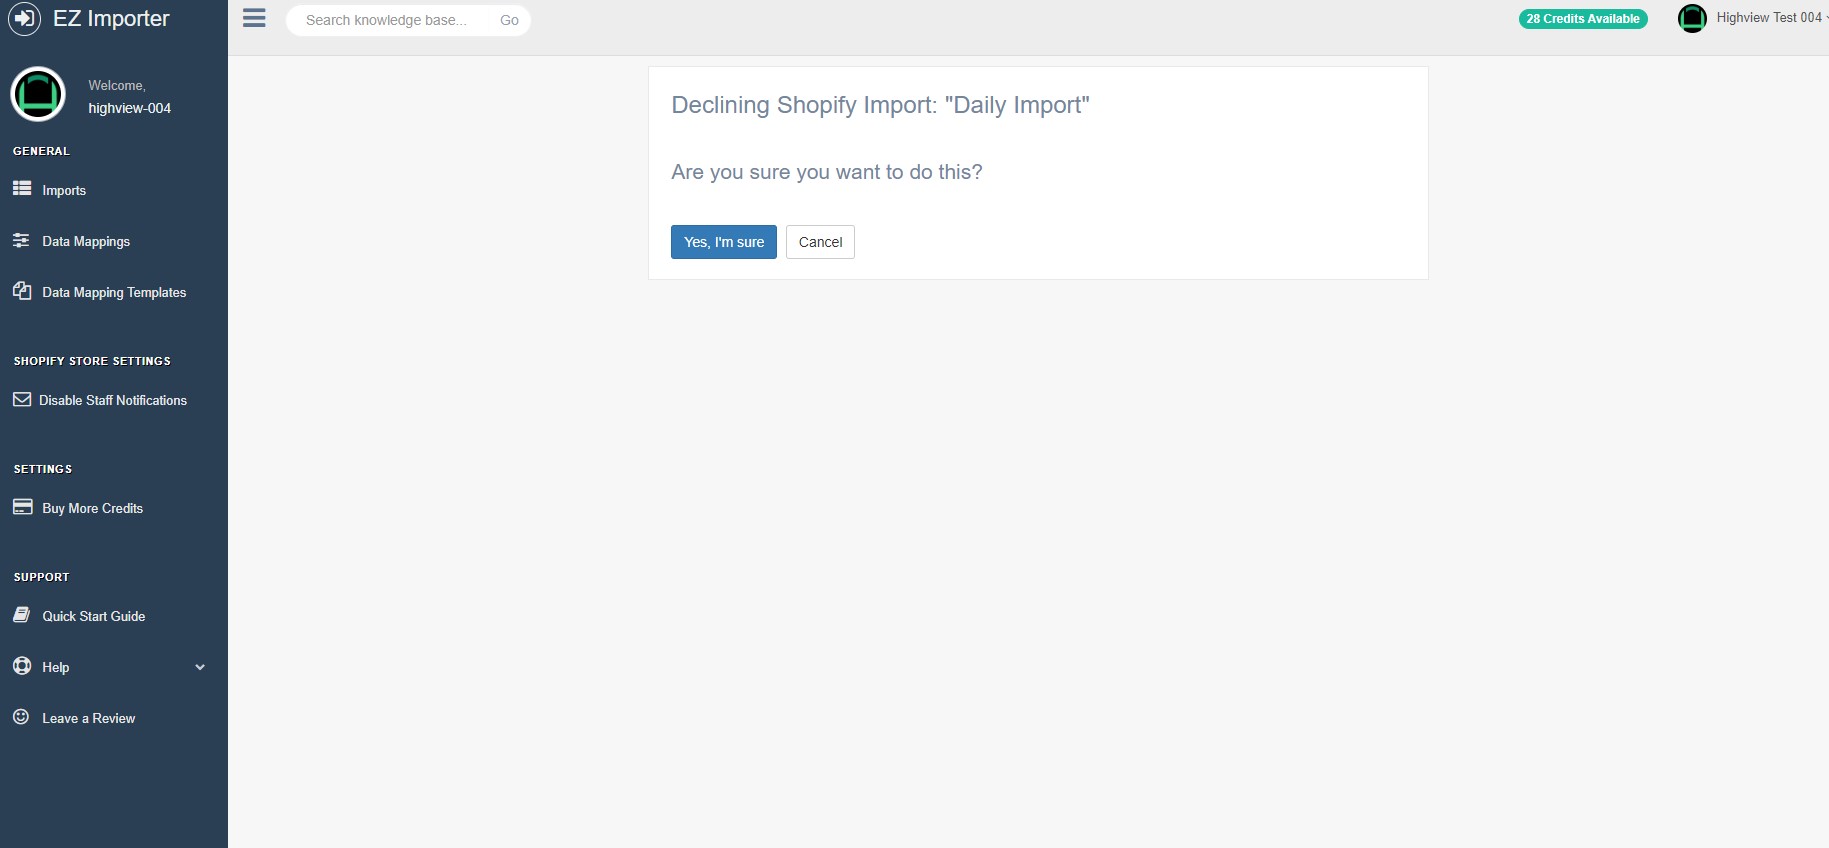
Once the button is clicked, the order will be marked as declined. The next time you bring up the order review page for this order, it will no longer allow you to import, and you will see a message at the top of the page letting you know the order has been declined.
Note: You can also decline the order from the "Import Action" buttons on the homepage. See the next section for more details.
Deleting an Import
Once you've imported your orders, you may want to go back and delete the orders from Shopify. If this is the case, EZ Importer allows you to delete all the orders from an Import (NOTE: We will be releasing a range and single order import in a future release). After your import has completed the "Import" button will be replaced by a "Delete Imported Orders" button on the bottom of the View Import Order page. If the order was not successfully imported, this button will not appear.

The "Delete Imported Orders" button will ONLY delete orders that have successfully been imported by this "Import Order". It will not delete any other orders from your store. Once you click this button you will be presented with a warning page asking you to confirm your order deletion.

This action is NOT reversible, so once you click the "Yes, I'm sure" button, you can not get those orders back unless you re-import the file. If you decide to delete the orders associated with this "Import Order," you can go back to the "View Import Order" page to see the progress of your deletion. The progress bar works the same way as the import progress bar.
Once the order is deleted, the "Import Order" will have a status of DELETED, and you will no longer be able to perform any more actions on that "Import Order". As always, if you have any questions or concerns about the delete action please let us know.
Orders can only be deleted if the import that used to import them is still in the system. According to our data retention policy, we only keep imports for 90 days. If an import is older than 90 days, you will not be able to delete the imported orders. To understand more about why we only keep orders for 90 days, please review our data retention policy below.
Cancel a Running Import
When an import is running, you may want to cancel the job at some point. You can do so by clicking the Cancel Import button at the bottom of the Review Shopify Import page.

Once you click the button, you'll be brought to a confirmation page. Click the Yes, I'm sure button to cancel your job. For a more detailed explanation about the feature, click here.
Import Action Buttons
On our app's homepage, you will see a bunch of buttons in the Actions column.

Clicking the Review & Import button will bring you to the "Order Import Review" page, where you can review your data and import your orders. Clicking the Delete button will delete all orders from that import, this button brings you to the "Delete Order" confirmation page. The View button will be displayed for orders that have been imported, declined, or have an error. Clicking this button will bring you to the "View Import Order" page. This page is the same as the "Review Import Order" page, except you can not perform any actions (i.e., Import or Decline). This page is here for your records, so you can see the status of your Import Order.
A few other things to know about the Orders Imported section on the homepage. This table will display details about your Import Order. You can see the status, the record count, the orders imported and the data mapping associated with the Import Order. If you want more details for the order click on the View or Review & Import actions.
Date Fields (Order Importing Only)
EZ Importer supports two date fields at this time, "processed_at" and "closed_at" on the Order Details tab and a "processed_at" field on the Transaction. Date Fields take a date and time as input. When working with date fields we recommend you use ISO 8601 Format. We realize that not all systems may be able to support this format type, so we also allow other formats. The time part of a date field is not required. If you do not supply a time with a date field we default the time to 12:00AM of the date provided.
Some Formatting Examples
- ISO 8601 Format: 20170701T13:00
- ISO 8601 Format no time: 20170701
- Month/Year/Day format: 07/01/2017
- Month/Day/Year 24 Hour Clock: 07/01/2017 13:00
- Month/Day/Year AM/PM Clock: 07/01/2017 1:00PM
- Month-Year-Day format: 07-01-2017
- Month-Day-Year 24 Hour Clock: 07-01-2017 13:00
- Month-Day-Year AM/PM Clock: 07-01-2017 1:00PM
If you do not provide a timezone with the date field, EZ Importer will use the timezone associated with your Shopify account. If you are comfortable with ISO 8601 Format and would like to provide a UTC offset, you can do this as well. Our data fields support the full ISO 8601 Format.
We recommend you read our full documentation on date fields here.
Activity Log
We provide the last 100 activities so you can tell whether an Import order was run successfully. From this log, you can see the Action performed, the File Name, Data Mapping associated with the Import Order, the Status of the action, the Message associated with the action, and the time it ran.

We also provide a search box for you to quickly filter your log data.
Data Retention Policy
EZ Importer generates logs of all imports that are imported to Shopify. We also keep the CSV file that is used to import the orders. When EZ Importer performs an import, we store each record in our database, which can generate a large amount of data. At this time, EZ Importer will keep all imported data (imports that are marked imported or partially imported) and logs in our system for a maximum of 90 days. After the 90 days have expired, we remove imports and all logs associated with those imports from our database.
We do this for privacy reasons as it helps us ensure we only keep data that was needed for your import. Since Shopify is the system of record, there is no reason for us to keep any customer data for more than 90 days. This also helps us keep in compliance with GDPR regulations. We will NEVER remove any data from your Shopify account (unless you use the "Delete" feature). All imports that are older than 90 days CAN NOT be deleted using EZ Importer since we no longer have a record of them.
All imports that have been deleted, declined, are in the file read state or have all orders in the import marked as an error will be removed after 30 days. We considered these imports to be stale after 30 days, and since there is no data in Shopify, we don't see a reason to keep them in our database. This again helps us keep our systems running smoothly while ensuring we do our best to be compliant with GDPR regulations. If you have questions about any of this, please don't hesitate to reach out to our always-helpful support team!
At this time we will keep the CSV files used for all imports for 90 days. These files may be deleted at your request.
Credit System
Our billing system is based on credits. When you first install the app, we give you 50 free credits. This allows you to test the application at no charge. An individual credit can be used for 1 import. So if you have an "Import Order" with 5 orders, it will take 5 credits to import that order. The credits will be deducted from your account ONLY if an order is successfully imported. If an order errors for any reason EZ Importer will not remove the credit. For example, if you have a CSV file with 5 orders in it, 3 orders successfully imported, and 2 errors out, you will only have 3 credits removed.
Your available credits are always displayed on the top bar of EZ Importer, you can see them on the top right hand side in a green button.

If you would like to purchase credits, click on the blue button labeled "Credits Available." This will bring you to the "Credit Bank" page. The credits you purchase have no expiration date; they will NEVER expire.

The "Credit Bank" page is where you view the details about your credits and purchase more credits as needed. On the top of the page, you can see how many credits you have purchased, how many you have used, and how many you have available. On this page, you can also see a full list of your credit bank history in the "Billing History" section. Every credit you've purchased will show up in the bank.
On the right side of the "Billing History" is the "Import Credit Packages" section which allows you to purchase credits at any time. Here, you will see a drop-down that will have a list of the credit packages we offer. You can click the drop-down, select the package you want to purchase, and click the Purchase Now button. From here, you will be taken to the Shopify billing page, where you can approve your purchase. Once you click the approve button, the credits will be added to your account, and they will show up in the "Billing History".
It's also good to re-iterate that your credits NEVER EXPIRE. They are available FOREVER.
Draft Orders
You can also import draft orders in addition to regular orders. To import draft orders, all you need to do is create a draft order Data Mapping and then use the newly created Data Mapping to import your draft orders. The Data Mapping will tell EZ Importer which order type to import the orders in your file as. We have a comprehensive guide on how to import draft orders here.