EZ Fulfill Documentation
Quick Start Video
Here's a short video (no audio) demonstrating the app's basic features and how you can fulfill your orders in Shopify in a little more than a minute: https://www.youtube.com/watch?v=L0FIaxqeB4A
Contents
- Getting Started
- Setup Your Data Feed
- Manual File Upload
- FTP And SFTP
- Dropbox
- Amazon S3
- Automation And Scheduling
- CSV File Format
- Excel File Format
- Advanced Options
Getting Started
EZ Fulfill supports fulfilling your orders via manual file upload or automatically via an FTP/SFTP, Dropbox or Amazon S3 feed.
The following formats are supports: CSV, TXT, TSV, Excel
CSV and Excel files must contain a header row as that will be used for the data mapping.
The only fields required are:
- the default location field
- the order number field (you can map by Shopify's order ID or by the Order name/number).
Setup Your Data Feed
A quick way to get started is by manually uploading a CSV or Excel file.
Step 1 - Create a Data Feed

Step 2 - Specify the Field Mappings
Here you can map your fields from your CSV file and set up your configuration and defaults. You'll need to map the Shopify order number or id in you're file and setup your location. We typically recommend using the order number but if you're not sure which order number field is in your file, click here to figure out which field to use.
By default, EZ Fulfill will use the location on your order when creating fulfillments. You can select a specific location if you prefer or if you have a location in your file, EZ Fulfill can read it from there. Click here to read more about how locations work in detail.

Click the Tracking tab to map your tracking numbers. By default, the Allow blank tracking number option is enabled which means you don't have to add your tracking details. We highly recommend proving the tracking number, company and tracking URL
![]()
You can also fulfill your orders by the product SKU and quantity. This allows you to partially fulfill your orders and create multiple fulfillments on your order. To do this click the Line Items tab. From here you can map the columns in your file to the product SKU and product quantity fields. If you do not want to fulfill your orders by the Product SKU, just leave the CSV Column Header Name fields blank.

Lastly, you can set the location of the order you're fulfilling from your file by mapping the location fields. When mapping your location, you'll need to specify the location type (which is Shopify's location name or Shopify's internal location id) and the column that holds the location you want to fulfill your orders from. This will give you the flexibility to fulfill your orders from multiple locations in the same file.
There are two location fields you can use. The first is the name of a location you want to fulfill your orders from and the second is a location you want to move your orders to. We recommend you read our documentation on locations before using this feature.

Manual File Upload
Step 1 - Click the "Upload File & Run" Action

Step 4 - Upload your Fulfillment File and Start the Sync

FTP and SFTP
Many suppliers use an FTP or SFTP server to provide access to their fulfillment feeds. If your supplier provides you an option to use either FTP or SFTP, we recommend that you choose the SFTP option as it provides more security.
Just as shown in the Manual File Upload section above, simply create a new Data Feed and specify the field mappings.
Then under the Source File section, select either FTP or SFTP in the dropdown and you'll be provided with additional options to enter the server's information and login credentials.
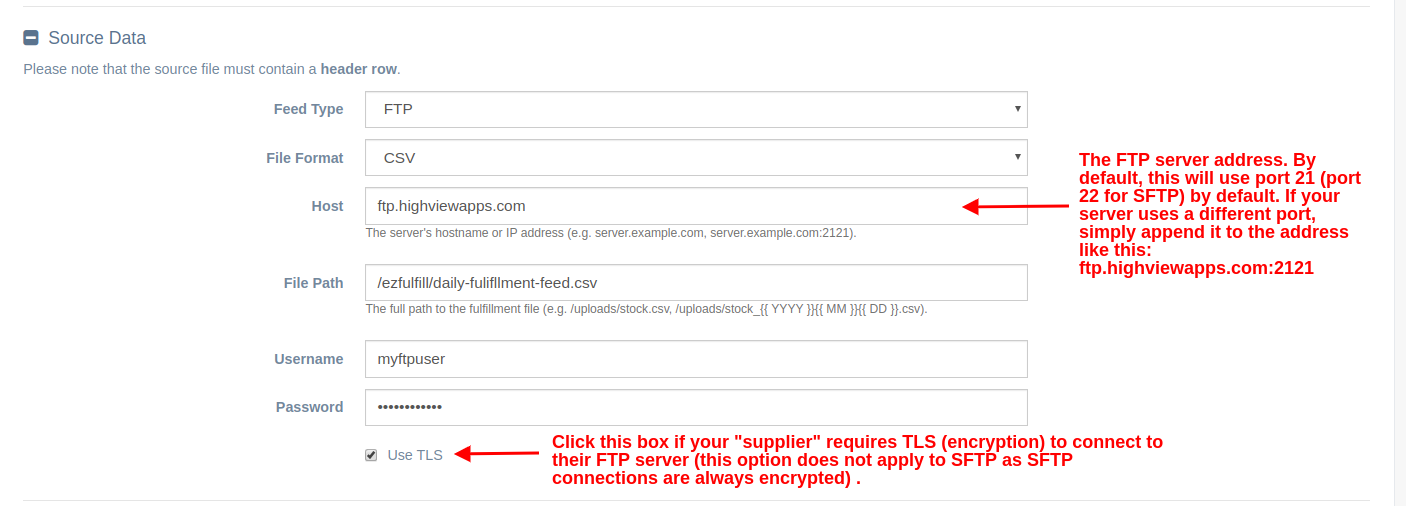
By default, the port number that will be used for FTP connections is port 21 and port 22 for SFTP connections. These are the standard ports for these services/protocols. In case the FTP/SFTP server uses a non-standard port, you can simply append a colon with the port number to the host address like this:
ftp.myserver.com:2121
You can also use an IP address like this:
192.4.5.6:2222
For the file path, you can use date variables which is based on the current date like this:
/fulfillments/my_fulfillment_feed_{{ YYYY }}{{ MM }}{{ DD }}.csv
or like this:
/fulfillments/feeds/{{ YYYY }}/{{ MM }}/{{ DD }}/daily_feed.csv
When selecting FTP or SFTP, you will also see an option to schedule the fulfillment updates. You can choose from Every 1 Hour, Every 2 Hours, Every 3 Hours, Every 4 Hours, Every 6 Hours, or Daily.

You can also setup post processing for your file once it's been processed. You may select the Do Nothing to File option which will leave your file intact. You can do this if you want to override your file before the next scheduled run. If you do select the Do Nothing to File post process option the file will be picked up at the next run even if you do not override it.
If you want have your file moved or renamed after the file is processed you can do so by selecting the Rename Processed File post process option.

This will call the FTP Rename command after your file has been processed.
For the file path, you can use date variables which is based on the current date like this:
/fulfillments/processed_feed_{{ YYYY }}{{ MM }}{{ DD }}.csv
or you can use a timestamp like this:
/fulfillments/processed_feed_{{ TIMESTAMP }}.csv
You can also reference the file name if you want. Do note that the FILENAME variable will keep the extension as well:
/fulfillments/processed_{{ FILENAME }}_{{ TIMESTAMP }}.csv
You can also use a wildcard syntax for more flexibility when setting up your FILENAME variables. This will allow you to pull multiple files from a single directory or you can look for a more generic file pattern in the directory. To read our full documentation on how to use wildcards click here.
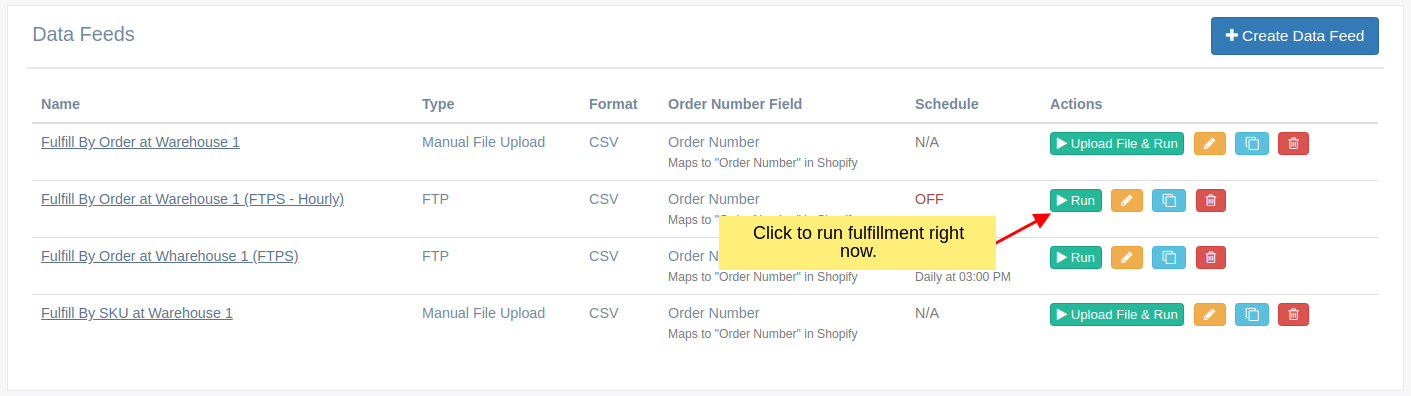
In addition to scheduling the fulfillment sync to run automatically, you can also run it on demand at any time by clicking the "Run" button in the main Data Feeds page.
Dropbox
We also support fulfilling your orders from Dropbox. Setting up your feed to run on Dropbox is very similar to how the FTP/SFTP configuration works. The main difference is that you need to link your Dropbox account to EZ Fulfil, which can be done by clicking the integrations menu bar. Once you've linked your Dropbox account with EZ Fulfill, you can configure EZ Fulfill to read your files from Dropbox. Read our Dropbox documentation to get a full walk through on how to setup your Dropbox account with EZ Fulfill.

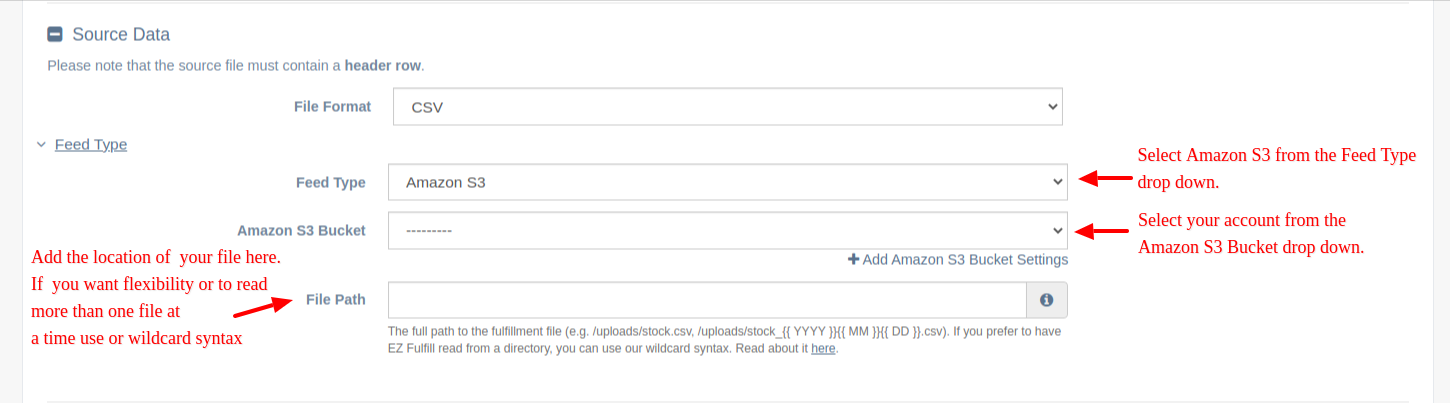
Amazon S3
We also support fulfilling your orders from Amazon S3. Setting up your feed to run on Amazon S3 is very similar to how the Dropbox configuration works. The main difference is that you need to link your Amazon account to EZ Fulfil, which can be done by clicking the integrations menu bar. Once you've linked your Amazon account with EZ Fulfill, you can configure EZ Fulfill to read your files from Amazon S3. Read our Amazon S3 documentation to get a full walk through on how to setup your Amazon S3 account with EZ Fulfill.
Automation and Scheduling
If your supplier uses an FTP or SFTP server, EZ Fulfill can be configured to automatically pull the fulfillment file from their server and update your orders fulfillment.
We currently support the following schedules:
- Every 1 Hour
- Every 2 Hours
- Every 3 Hours
- Every 4 Hours
- Every 6 Hours
- Daily (you specify the time)
Note that due to Shopify API limits, we can only update roughly 1-2 variants per second. Our system will automatically stop the sync process if it's running for more than a certain amount of time (e.g. if the schedule is set to run "Every 1 Hour," the maximum run time for that task is 1 hour).
CSV File Format
The CSV file must contain a header row and the file extension can be anything (e.g. .csv, .txt, .tsv, .123, .abc) or no file extension at all.
We support the following data separators/delimiters:
- comma (",")
- tab ("____")
- semicolon (";")
- pipe or vertical bar ("|")
- caret ("^")
EZ Fulfill will automatically detect the delimiter being used by the CSV file so you don't need to specify this option anywhere.
Excel File Format
Our app can read both old Excel XLS format and the newer XLSX format.
You'll need to specify the Excel Sheet Name to use as well, which we default to "Sheet1" as this is the common default in many spreadsheet applications.
Our app expects the very first row to be the header row. But if the Excel file doesn't have a header row, there's a "Create virtual header row" option you can use which allows you to map data based on the column's position. If the Excel sheet has additional rows before the header row, this option is a way around that as well.
Advanced Options
All the advanced options below are optional.