How Can I Import Refunds?
Getting an order imported as a refund can be a little tricky. This article will walk you through what you need to do to import an order as a refund.
Mapping Transactions
The first thing you need to do when importing refunds is map your refund transactions. You'll need to map the transaction that was made when charging the customer and then mapping the transaction for refunding the customer. For more information about mapping transactions click here.
When mapping the "payment" transaction, all you need to do is map the transaction.amount field to the amount the customer paid. This is usually an Order total column in your CSV file. You can map the transaction.kind field if you'd like but it's not required as Shopify defaults this field to the value capture. This field requires you provide a static set of values, you can read more about the values you need in our transactions article.
Now that you've mapped the "payment" transaction, you'll need to map the set of fields in your CSV file that have the refund transaction data. For this you will need to map both the transaction.amount field and the transaction.kind field. The value you map in your CSV file to the transaction.kind field must be refund. If you do not provide the correct transaction.kind value in your CSV file the transaction will not be displayed as a refund.
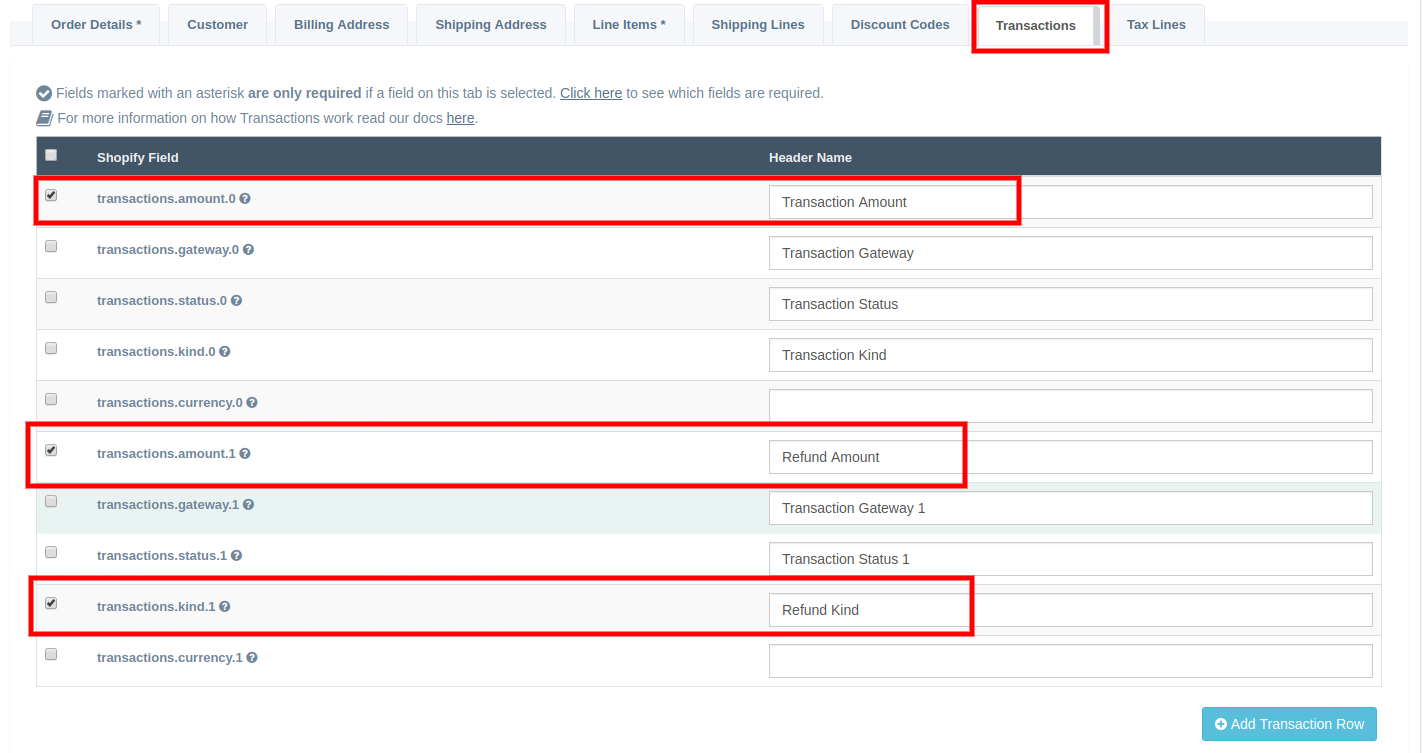
Once you have your transaction fields mapped you'll have to make one more mapping change.
Mapping Financial Status
For most imports you won't need to map the financial_status as this field defaults to the paid status. However, when mapping refunds you'll need to map the financial_status as refunded, otherwise your order will not show up in your reports, etc. For more information about this, check out our docs here.
To map the financial_status, click the Order Details tab on the data mapping.

From here, map the financial_status to the column in your CSV file that has the correct financial status value. Remember this field allows a set of static values or it will throw an error, so make sure your refunded orders have a value of refunded and your other orders are marked as paid (or one of the other valid financial status values). Once you have this properly mapped you can save the data mapping.
Shopify Admin
Once you setup the data mapping, you're ready to import your refunds. As always you should run a few tests before doing your full import, especially if you're going to import refunds. Below is a screenshot of what a refunded order should look like.

The order should be marked as Refunded, you should see two transactions (Paid by customer and Refunded) and you should see two transactions in the timeline.
Refund Date
When importing your refunds, the refund date will be the date you do the import. At this time Shopify does not support adding the refund date on the Order API. Since they do not allow us to provide this field on import we do not have a way to set the refund date.
If you have any other questions about refunds, feel free to let us know.
App: EZ Importer
Tags: ez importer, refund, faq, csv